.JPG)
.JPG)
2014 Quinoa 藜麥

.JPG)
Videos 短片:
Water Quinoa Garden 藜麥園澆水


大部分的植物都需要很多水, 尤其在幼年期, 蔬果園的水, 來自冬天儲存的屋檐雨水 (1500 加崙大桶), 不用電力


Quinoa (RIGHT) and Amaranth (LEFT) starters


In your set of circumstances the following may be of no help
at all. I am simply citing some things which have had some impact at my
location. I could be mistaken and just lucky here and there to get any crop at
all. With that in mind, here are some suggestions. Treat this as open source
information and modify as needed for your location and resources.

Quinoa can be thought of as a crop “sequence” if homegrown quinoa is an important food staple. The first crop can start as early as January/February. The second crop is started in March/April. A third crop can be started in June. Of course the dates have to be adjusted according to the weather that year. The notable improvement in professional forecasting is a great aid in crop planning. Any of the three crops may fail, but most likely at least one will succeed. Adjust your methods and varieties to the advantages of the starting month selected. Each season harvest will provide just one portion of your years harvest total. The focus here is on the early season crop at my location. The second and third crops at my location would be grown more in line with standard crop guidelines. Online seed sellers often have useful things to say about each variety they sell, helping your selection process. So far, my best varieties have been Brightest Brilliant Rainbow and Redhead from Wild Garden Seed, Apellewa, Daves 407, Temuko and Campesino from Bountiful Gardens, and Chadmo from Adaptive Seeds.
Early Season
The early season quinoa crop minimizes irrigation, taking
advantage of spring rains and increasing day length for growth. Cool spring
temperatures including light frosts are fine for quinoa. Careful varietal
selection helps to maximize early season advantages. Harvest in late June and
early July avoids, generally, the 95+ degree seed development problems of mid
to late summer, although if nights are cool then daytime heat is less of a
problem. Harvest before fall rains is desirable since wet seed can sprout right
on the plant. To get started, transplanting rather than direct seeding is
likely the way to go.
Positions and spacing: Maturing a good crop on rainfall at
my location with close spacing would be chancy. Two feet between plants and
between rows seems about right. If I had more room (I still might crank up the
old tiller to build another new planting area, say 50 feet by 50 feet), 3 foot
spacing would be worth a try. Wider
spacing also is more accommodating to older gardeners such as myself. I think
in terms of how many plant positions I have given the bed or area size and the
spacing I choose. If I have 100 plant positions I will start enough transplants
to fill all 100 positions and replace any that die or lodge or get eaten or
blown away or rain battered, etc. This is different from direct seeding in rows, then thinning and second seeding, or even tolerating empty spots. Make sure each position gets
used. Paper records are done in a grid to match the garden.
Transplants and tools: Transplants are delicate, especially
the roots. Standard pots are not the best, at least not for me. I use 4”
lengths of squarely cut thin-wall 1-1/2” pvc pipe, set into a tray of correct proportions to securely hold the
pipes upright when handling—thin-wall pipe because it is cheaper, easier to
work and it holds more soil than thicker wall pipe. Size the trays to suit your
needs. Fill the pipes with a fine grained potting soil which will stick
together well enough to prevent the soil from dropping out the bottom when
picked up. Find a 1 gallon plastic jug with a 1 inch cap and a handle. Cut the bottom off, discard the cap, turn
upside down, fill with potting soil, place over an empty pot and use a thin
stick to work soil into the pot. Fill each pipe to about 1/4” from the top,
tamp slightly, and then fill with water. The water will settle the soil,
probably unevenly, so even up the soil in the pipes, being sure the soil is
appropriately moist for seeding. Level the soil in each pot and place 1 to 4
seeds, spaced carefully, into each pot and cover with about 1/8” additional
potting soil or fine sand. Use a water sprayer to wet the seeds. Place the
trays in a protected location with a temperature of 60 to 70 degrees F.
I use an easily made tool set for setting out the plants. 1) You need a small size trowel for digging a 4 to 5 inch deep hole about 3” in diameter. 2) Cut a 12” long piece of 1-1/2” thin-wall pvc pipe long-ways for about 9 inches of the 12” length. Make this 9” cut so as to divide the piece of pipe equally. Then make an angled cross-cut to remove one of the half sections. File off sharp edges and corners. This is called the transplant tool. The 3 inches of intact pipe will be the tool handle and also provide a cover for the top of the transplant as it rests in the tool. 3) Size a round dowel or tree limb, about 8” long, to fit easily into and through a transplant pot. Make sure one end is flat and smooth. This will be used to push the transplant out of the 4” pot onto the transplant tool. Call this piece the push rod.
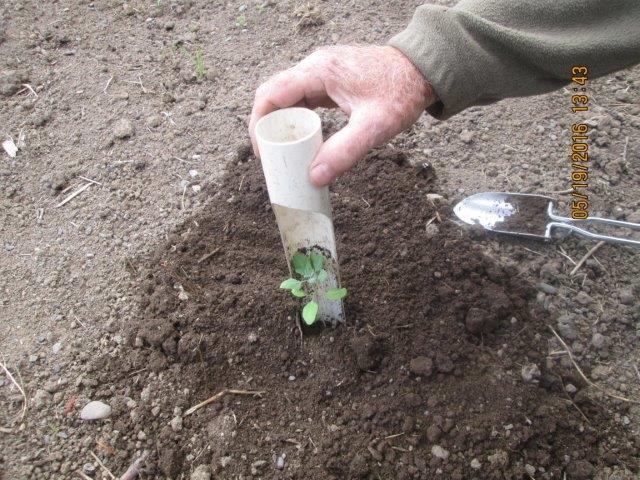
Setting out: The transplants are ready when they have 2 to 3
sets of true leaves. The setting out date can be delayed if the weather is not
yet accommodating. So you take your transplants and tool set to the planting
bed where you have determined your planting locations. Use your trowel to dig a
hole. Now pick up a pot and place the pot top end carefully onto the edge of
the transplant tool, holding with one hand. Then pick up the push rod and push
the transplant out of the pot onto the transplant tool so that the full length
of the soil plug is supported by the tool. Keep the plug straight when pushing
to prevent breaking the plug and tearing roots. If necessary pause and help the
transplant to head into the hollow pipe tool handle. Now carefully insert the
tool with the loaded transplant into the hole and fill with fine soil. Slightly
jiggle the tool and raise it out of the hole without lifting the transplant.
Softly press dirt around the plant and water in to settle the dirt around the
plug. The transplant is finished. Apply protection if appropriate.
Protection: Just as plants benefit from the protection of a
greenhouse, individual transplants can benefit from a simple protection ring
until they are about 1 foot tall, at which point the protection ring can either
be removed for re-use or left in place until harvest. The protection ring is
made from 4” diameter drainpipe cut into about 3” lengths. The ring is placed
over the transplant and pressed slightly into the newly watered soil around the
plant. If the ring is a little long it can be tipped toward the sun to insure
adequate light. In my case, the protection ring provides worth while protection
from slugs, crawling insects and maybe some mice. This protection is not
perfect, but it helps. I have used rings of different sizes and materials but
the 4” diameter size is most useful for me. The home grower must expect to lose
some of his transplants, more or less depending on conditions that year. My
suggestion is to raise at least twice as many transplants as you need to fill
all your early season transplant positions. That way you can replace your
losses, or try a later planting if necessary. Farming is different than
gardening. Protection rings and replacement transplants may not be practical
for the farmer but are do-able practices for the home gardener. Pots, trays and
rings get to be something of an investment in time and resources; this may
limit your practice. Doing several sets of transplants with a more limited set
of pots and trays through the spring may be the way to go.
Lodging: Quinoa is susceptible to lodging, more so during wind and heavy rain. At the homegrown scale, a daily watch can catch plants that are tipping over. Support with stakes, bamboo is good, or use limb wood, even scrap metal rods. Wrap the plant with soft twine and fasten to the stake. Two or three stakes may be required. Some plants will recover and support themselves. Other plants will continue to need support but will make seed enough to harvest. Some plants, once the stem is bent, wither and die. Spot and treat the problems as soon as they occur, replacing damaged plants with replacement transplants where needed. If, when seeding the pots, you use more than one seed per pot you might have pots with more than one strong seedling. You could try leaving 2 or even 3 seedlings to grow and transplant. At two months of age and over three feet tall I have several double and triple stemmed transplants which are as large and strong as the single stem transplants. I have not made up my mind about this practice but it is interesting to experiment. I am wondering if planting in some form of clumps would reduce lodging. For example, drive re-bar stakes at 4 foot spacing, transplant near and around the stakes with four or five plants each. Allow to grow 2 to 3 feet tall and then circle the clump with twine and fasten to the stake at a direction which opposes any noticed leaning.
Fertilizer: In general, the better the soil the better the
crop. On marginal soil, fertilizer can help. After transplanting, I limit
quinoa fertilization to the use of fish emulsion applied to the soil around the
plant with a hand sprayer. This is inexpensive, apply before or during a rainy
spell. I prefer to send a soil sample to a professional testing service and
then apply organic fertilizer accordingly as part of the soil building or
maintenance process.
Harvest and Saponins: Harvest is covered at many websites so
I will not repeat here. It is necessary to remove the saponins from the seeds
before cooking. Commercial sellers remove the saponins with expensive
machinery, which shows up in the grocery store price. The home grower will have
to find a satisfactory method with lower tech and less expensive tools. Most
practical for me is the use of an electric blender. Put 1-1/2 to 2 cups
unprocessed quinoa seed into the blender and fill the glass to about ¾ full.
Put the lid on and begin pressing the low speed button on and off (maybe 5-10
second bursts), until the soap is obvious. Pour off what floats with the soapy
water, being careful to not pour off what does not float. Re-fill with water
and repeat. This will need to be done 5 or 6 times before the water is clean
and reasonably clear. Taste several seeds. If bitterness remains resume with
the blender. Otherwise, pour into a strainer and do a final rinse. This process is easy but
requires about 5 or 10 minutes. Quinoa cleaned this way will not be bitter and
will be delicious when cooked. Other methods can be found on the web.


Varieties: It may take a season or two to find varieties
that do well for you. Varietal information is available on the web. There is
considerable varietal work being done at many locations around the world . The
most interesting possibility, to me, is the development of saponin-free varieties.
A vigorous highly productive variety which requires only simple seed rinsing
and is adapted to my locale would be valuable seed indeed.


沒有留言:
張貼留言